
Retro Arcade
- waeggy123

- Feb 1, 2024
- 7 min read
Updated: Mar 10, 2024

You have it in front of you, the long-awaited retro handheld with a micro SD card full of games ... maybe!
Often these game collections are quite modest, contain many duplicates, poorly translated, faulty games and useless hacks. This can quickly lead to you losing the fun of retro gaming, but that doesn't have to be the case!
Have you ever read about or even tried out the "Retro Arcade Image"?
the idea
In 2021, the idea came up to create an image for the retro handheld community that would make it easier to enter the wonderful world of retro gaming. Initially, this was intended for the Anbernic RG351P, which was the icon among retro handhelds at the time and is still popular today.
The basic idea of community project:
"write a 128 GB image to a micro SD card, insert it into the handheld and play"
It was no longer necessary to create everything yourself, e.g. to collect bios files and games, to find ideal settings in the operating system.
the implementation
So a few enthusiasts got together and after a short time (including sleepless nights) the first image was ready. Based on the operating system (custom firmware) ArkOS, which offered the best features at that time.
Game collections from consoles, handhelds and PC systems were collected and added. The games were tested thoroughly and summarized in a feedback sheet in order to replace faulty games and find the best settings, as well as wishes and suggestions that further optimized this retro arcade image.
the update
With great success and a lot of hard work, the time had come and starting with the release of Retro Arcade v.01 at the beginning of March 2021, Retro Arcade v0.3 was released for download via torrent about three weeks later, which is still being shared diligently today.
compatibility
Over time (from March 2021), of course, other retro handhelds came onto the market and you could continue to use the image on devices such as the Anbernic RG351V and RG351MP, but adjustments were necessary, which every user of a handheld had to make themselves with information from the Internet and forums.
Now, almost three years later, the time has finally come:
Retro Arcade v0.4 is ready!
While retaining the basic idea of a community project, two nerds (guess who) have adapted the Retro Arcade v0.4 image to meet the needs of the community.
The base image remains the same as usual:
current ArkOS custom firmware with customized emulators and themes
over 40 systems with a total of more than 13,000 games and few selected ports
complete boxart
suitable for a 128 GB micro SD card (SanDisk or Samsung) or larger.
Retro Arcade v0.4 is now more than that:
it supports 14 devices (instead of RG351P and RG351M only) with individual settings
stackable for your preferred usage (e.g. load the base image and add the full game collection or just select your preferred systems and ports)
almost complete port collection from Portmaster (without the "ready to run" games)
The following devices are now supported:
Anbernic RG351P
Anbernic RG351M
Anbernic RG351V
Anbernic RG351MP
Anbernic RG503
Anbernic RG353P
Anbernic RG353PS
Anbernic RG353M
Anbernic RG353V
Anbernic RG353VS
Powkiddy RK2023
Powkiddy RGB30
Game Console R35S / R36S
Gameforce CHI
step-by-step
To install the RetroArcade image a 128GB or higher micro SD card is required. It's
recommended to use a high quality brand like Samsung or SanDisk since other brands
may not provide the full capacity with their cards.
Required Tools:
7zip file archiver - to unzip .7z files
Win32DiskImager or Balena Etcher - to flash the image file to the microSD card
DiskGenius or MiniTool Partition Wizard - to extend the EASYROMS partition
JDownloader Download Manager - to download large files from websites (optional) important note: please uncheck the Archive Extractor in the Settings of JDownloader otherwise all zip / 7z files will be extracted and the easyroms.7z will be unnaturally enlarged and won`t fit on a 128 GB SD card.
step 1:
Download the Retro Arcade image file to your PC from here. Click on "SHOW ALL"

Ensure you download the correct base-image for your device (identify by the image name
please) and the easyroms.7z file

Downloading large files could cause some brake downs with several browser. It is recommended to use a download manager like JDownloader. Check out the short tutorial here.
After the download is complete, insert the micro SD card to your PC and start
Win32DiskImager or Balena Etcher.
step 2:
Choose the RetroArcade_v04_*device*.img file as source and the drive of your
microSD card as target to flash the image to your micro SD card.

confirm the overwrite message with "yes"
step 3:
Now you should see two drives (Boot, EASYROMS)
If you don't see a drive named EASYROMS, it's most likely that Windows did not
automatically assign a drive letter to that partition on your SD card.
This can be resolved by using DiskGenius or MiniTool Partition Wizard:
Start the tool and choose the SD card with the EASYROMS partition label, then assign a
drive letter to the EASYROMS partition by right clicking on the EASYROMS partition and
selecting Assign Drive Letter or Change Driver letter and Path, then follow the directions
from there.
Once completed, the drive should show up under My Computer. You typically only need
to do this once.

step 4 :
In this step you have two options:
fast or safe method, choose one of them.
(be aware with the fast method, data loss can happen but it is not usual and in our testing it never happened. Just for the case you observe any issues, please use the safe method)
fast method:

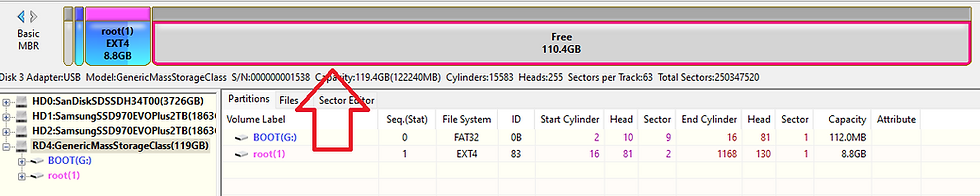
Do a right-click on the EASYROMS partition and select "Resize Partition"

Place the mouse between the blue and grey part until you see this symbol <-->, now click with your mouse on it, hold and pull it to the right. If done, you will see the picture below

Now it is time to press Start

then Yes and

and again Yes

Confirm it with Complete, close DiskGenius and your SD card is ready for step 5.
safe method:
Create a folder e.g. named "backup" on your Desktop, open the EASYROMS partition of the micro SD card, click on one folder, then press Ctrl+A and copy the complete content of the EASYROMS partition to your "backup" folder on your PC (Desktop) as a backup.

Open DiskGenius (or MiniTool Partition Wizard), search for the EASYROMS partition on your SD card, right-click on the EASYROMS partition,
select "Delete Current Partition" and confirm with "Yes".

It will show up a new partition
right-click and select "Create New Partition", choose exFAT as file system and name the
partition (Volume) as EASYROMS, then accept the process with OK.

Now click on "Save All" in the upper left corner

and close DiskGenius (or MiniTool Partition Wizard).
Copy back the content of your "backup" folder on your PC (Desktop) to your new created EASYROMS partition on the micro SD card.
step 5:
Extract the content of the previous downloaded easyroms.7z file to your
EASYROMS partition. That will take some time...

Safely remove it from your PC and insert it to the TF1/INT slot on your device.
Power up your device and enjoy the Retro Arcade v0.4 image!
additional information's:
If you only want to have your preferred systems and ports on your device, just follow this guide until step 4.
Copy back the content of your "backup" folder on your PC (Desktop) to your new created EASYROMS partition on the micro SD card.
Go back to this page and select "easyroms_single_sets", choose your preferred system and extract the content in your EASYROMS partition.

If you would like to add some more ports or just choose your preferred one, go to this page,
select "ports_single_games", download the game and extract the content into your "ports" folder in the EASYROMS partition.

Don´t forget to download and extract the content of "Boxart_And_Description.7z into your ports folder (EASYROMS partition) to enjoy the better overview of your ports.
setup a second SD card
If your device is supporting a second SD card slot (TF2) just follow the instructions from
step 1 to step 4 depending on the size of your SD card.
The image was initially created on a 16 GB SD card and can be written on an every 16 GB as well without resizing a partition (step 4). To sum it up:
SD card = 16 GB follow the instruction from step 1 to step 3
SD card > 16 GB (larger) follow the instruction from step 1 to step 4
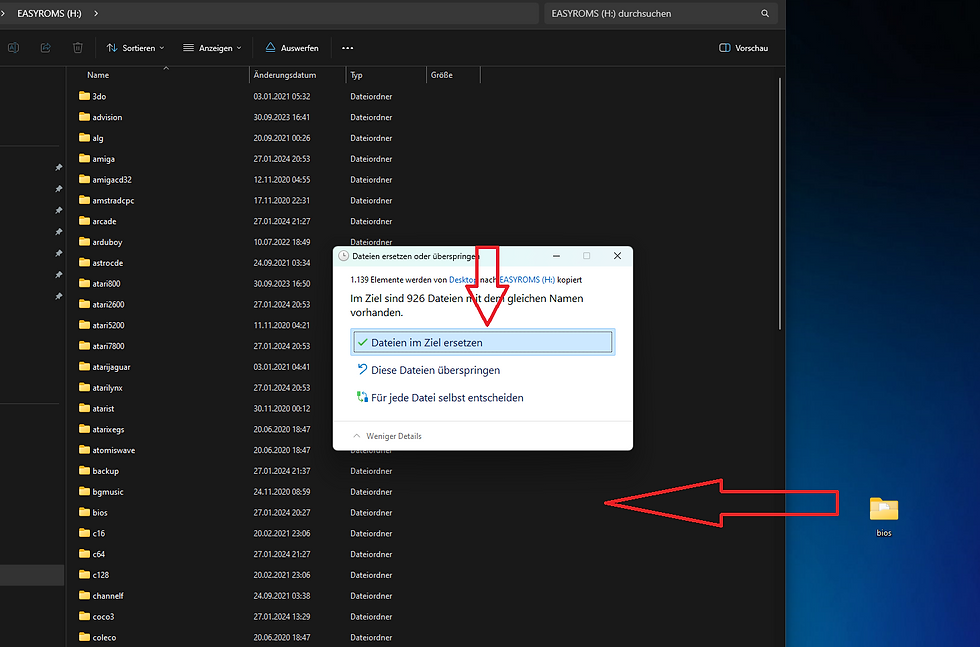
Now it is time to do a backup of your bios folder in your EASYROMS partition.

Drag & Drop your bios folder to the desktop.
Safely remove the SD card from your PC and place the SD card into TF1 slot of your device.
Add another large SD card, freshly formatted in exFat into the TF2 slot of your device.
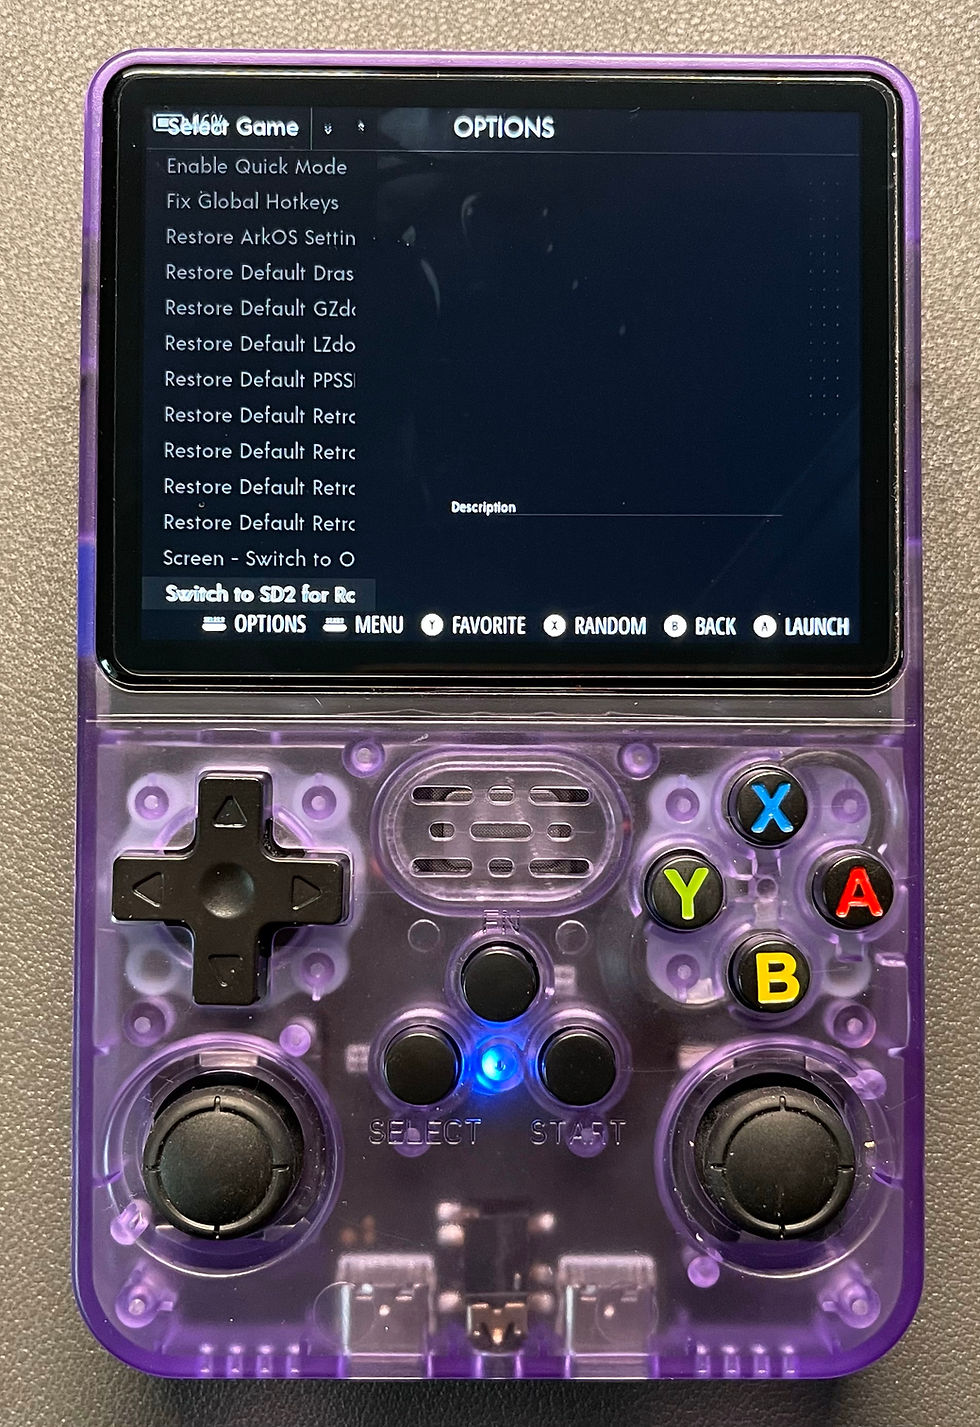
Boot up the device and go into Options, then in *Advanced, go down to
Switch to SD2 for Roms and the process will start automatically.


If it is done, shutdown your device and remove the SD card from TF2 slot and plug it into your PC.
First copy back the bios folder
then continue with step 5
link section
(use the Backup website just in case your download will be to slow.)
direct links:
Anbernic
RG351P, RG351M --> click here or click here or click here (zipped version max. 8GB)
RG351V --> click here or click here or click here (zipped version max. 8GB)
RG351MP --> click here or click here or click here (zipped version max. 8GB)
RG353P, RG353PS, RG353M --> click here or click here
RG353V, RG353VS --> click here or click here (zipped version max. 8GB)
RG503 --> click here or click here (zipped version max. 8GB)
Powkiddy
RK2023 --> click here or click here (zipped version max. 8GB)
RGB30 --> click here or click here (zipped version max. 8GB)
Game Console
R35S, R36S --> click here or click here or click here (zipped version max. 8GB)
Gameforce
CHI --> click here (zipped version max. 8GB)
easyroms.7z --> click here or click here
easyroms_single_sets --> click here
ports_single_games --> click here
bios.7z --> click here


HI all. The image is not up on the servers for the R36S, there is another way to download it?
non mi fa visuallizare niente
can you reupload easyroms folder please? is no longer avaiable :(
Niestety linki nie działają. Prosze o aktualizacje.
Stardew valley and heart of darkness ports not working, know why? i have an R36S with panel 4 and had to find a runourund to avoid black screen, could this be the cause?